My Laptop won't turn on - solutions
Possible reasons you laptop will not boot:
- Faulty Laptop Charger
- Faulty DC socket
- Static
- Faulty Bios
- Overheating
- Faulty graphics chip
- Faulty motherboard
- Faulty laptop screen
Faulty Laptop Charger
A Faulty Laptop Charger has been covered on another page but I'll cover it here as well. There are a couple of ways to find out if your Laptop charger is faulty. Firstly, if you have a multi-meter available, test it by inserting the positive into the centre of the charger barrel and the negative to the outside. This will give you the voltage out (typically 19v but could also be 15v, 18v or 20v) - check it against what it should be on the bottom of the charger. Some Laptop chargers have a pin sticking out (mainly Hp, Compaq and Dell Laptop chargers). For these types, make sure you do not short the centre pin with the inside of the barrel
The second way is much easier - but only if your charger will fit in a friends Laptop! Just plug it in and see if it charges the Laptop Battery.
The second way is much easier - but only if your charger will fit in a friends Laptop! Just plug it in and see if it charges the Laptop Battery.
|
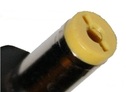
** Tip A - if your charger barrel looks like this>>>>> |
|
Disconnect the mains plug and wait 30 seconds, get a pin / needle and look inside the barrel where you will see 2 pins against side of the barrel wall on opposite sides (where you can see the notches in the pic above), now push the pin to the outside of each pin inside the barrel and ease towards the centre of the barrel, allowing enough room for the centre pin inside the laptop socket to be inserted. Sometimes the pins inside the barrel get pushed to the outer walls over prolonged use and no longer makes sufficient contact with the centre pin in your laptops' socket. This also sometimes fixes the "plugged in but not charging" message.
Faulty DC socket
One of the most common repairs we do is DC sockets on Laptops. The plug into the socket is a bad design and wasn't thought through very well. The lead gets pulled and knocked around and usually the socket on your motherboard inside the Laptop is soldered on by 5 points. It's very easy to knock this socket from its position and make it loose - breaking the solder connections. The way to see if it's loose is to unplug from the mains and take the battery out. Get a pen or something small of that size, insert gently into the socket and just wiggle it about to see if there is any movement from the socket. You may get a little (only a little though) movement from the center pin...but the rest should be solid. If there is excessive movement anywhere from the socket then it has been knocked off its solder points and will need re-soldering or replacing. Also if you know the charger to be fault-free then this may also indicate it's a socket problem. Another basic test is to have your battery in with the charger lead, GENTLY move the charger plug around to see if there is an intermittent connection by looking at the charging light on your Laptop at the same time. This would indicate either the charger or socket...so first try **Tip A to make sure the charger is connecting properly. If not and the light comes on with movement of the charger barrel, then if you know the Laptop charger to be ok, then it's the socket at fault and needs to be repaired.
Static
Occasionally your laptop will not boot because of a static electricity build-up. You can clear this yourself quite easily. The way to clear static from a Laptop is to unplug the charger and remove the battery first. It's also recommended to remove the hard drive and RAM as well. This isn't always needed but just to make sure I would do it. Usually the hard drive and ram are located underneath your laptop via a cover you have to remove. Sometimes they are located under the keyboard. So make sure you know how to remove the RAM and hard drive from your laptop first. Then it's a simple case of holding down your power button for a min of 30 seconds. Some websites say 1 minute but 30 seconds is enough time to dissipate the static from your laptop. This is what you are doing when you hold the power button - attempting to draw a current from the system - but it has no power supply so it uses whatever is left floating around inside the laptop and uses it all, thus clearing it of any excess. After this, plug everything back in and try and start your laptop. It WILL work for some people but not others - there is no way of telling what you problem is untill you try all the points mentioned on this page.
Faulty BIOS
The BIOS is your laptop's Basic Input / Output System and is a separate part of you laptop to your Windows installation. When you press the 'ON' button, the laptop first accesses the BIOS to see what order to start up your laptop, the time, date, laptop settings, security features and much more besides. Without a BIOS your laptop won't start up. It also initiates a POST - or, Power On Self Test which will perform a basic test on your systems hardware to make sure everything is as it should be before attempting to boot into windows.
The BIOS information is stored in a special kind of memory that doesn't disappear when the laptop is turned off. It is called ROM - Read Only Memory and is different to the Memory you can take out and replace underneath your laptop. This is RAM - Random Access Memory and any information stored in it will go when you turn your laptop off.
So we know what the BIOS is and does (very basically). This CAN, very occasionally become corrupt. If this is the case your laptop will not boot into windows. On some laptops, there is a BIOS recovery key combination or an application you can run from a USB flash drive, so below are some links to help you. These methods may also apply if you have updated to the wrong BIOS by mistake:
HP BIOS recovery
Dell BIOS recovery
Acer BIOS recovery
Lenovo BIOS recovery
These methods will not work for everyone, which MAY indicate it isn't the BIOS that is faulty. So next, we have to consider overheating of the VGA card (Graphics card / GPU)...
Signs the Graphics chip is faulty
- Fan and lights work but black screen on boot
- You can get an image through a VGA cable connect from the Laptop to an external monitor only
- Multi-coloured lines running through your screen
- Images generally very unstable
The problems listed above can also be caused by a faulty screen - see below
How to fix a faulty laptop graphics card (overheating)
What is a Graphics card?
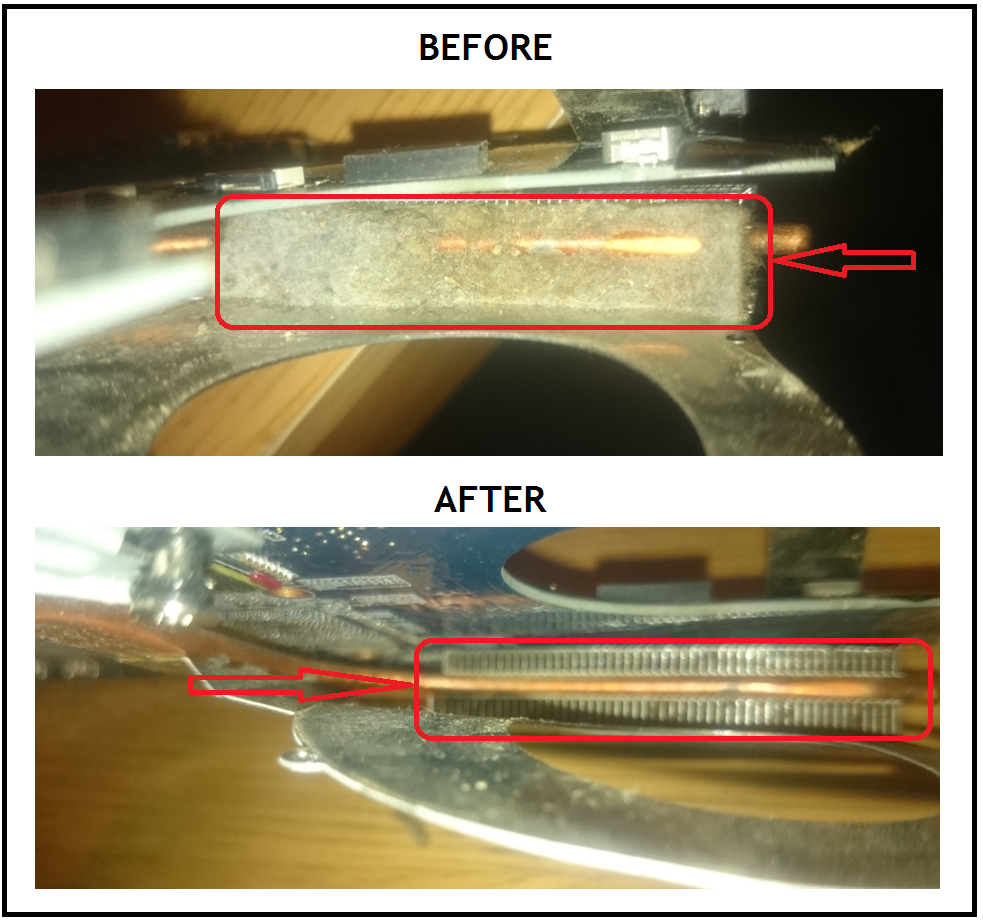
The graphics card is also known as the VGA card or GPU, and is the processor that delivers all of your images on the screen. Without this your laptop is useless! A good indicator of whether this could be the culprit as to why your laptop will not turn on is that before your Laptop stopped turning on, it ran very hot underneath. This may have happened because of one or two reasons - either (which is the most common), the laptop has accumulated a considerable amount of dust in the exhaust part of the laptop after the fan. See pic below of a typical blocked system before and after a clean that I do on a regular basis.
Another common problem is that people constantly keep the vent underneath the laptop blocked - by using the laptop on a bed or on their lap. Yes, they are called 'Lap-tops' but because the manufacturers decided to put the air-inlet vent underneath, using it on your lap constantly is a dangerous thing for the health of your laptop. Using on your lap or bed blocking the air-vent, prevents cool air from entering the laptop, and stopping any cool air from reducing the operating temperature of the graphics chip and CPU.
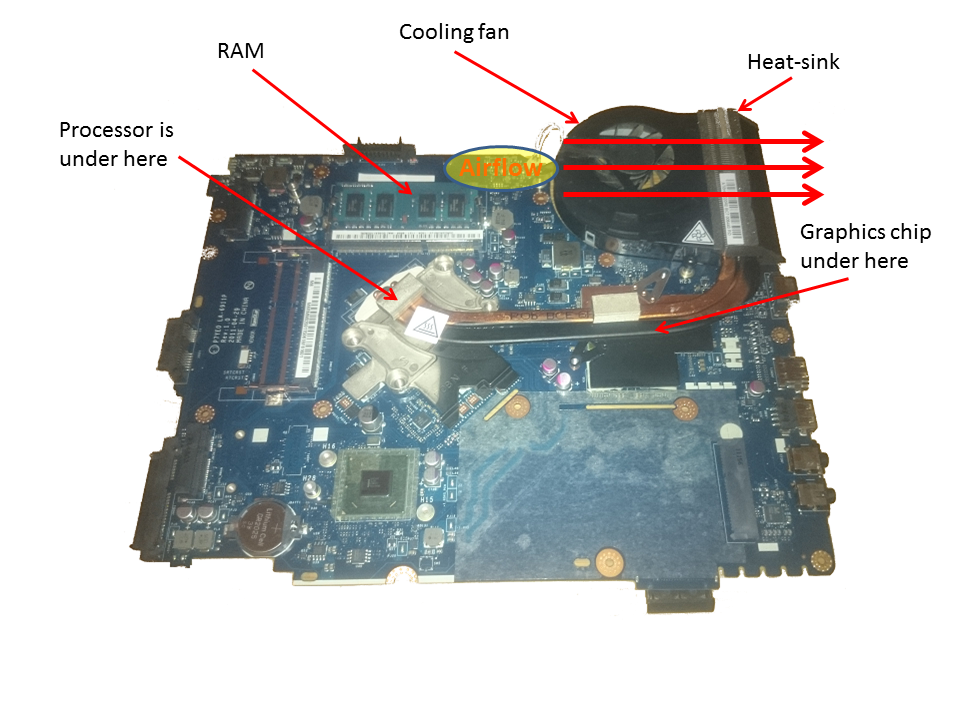
The way in which laptops are cooled is very simple - air is drawn in by the fan via the vent underneath, the air is pushed out of the side of the laptop through the heat-sink vent which is metallic and resembles a crude car radiator (and works in a similar way). This heat sink has usually a copper pipe that runs through the laptop and sits on top of the CPU (Laptop's processor) and the Graphics chip. Because the air that is sucked in is cool, it cools the pipe and thus the CPU and Graphics chip. It needs a clear, dust-free heat-sink to operate effectively.
The way in which laptops are cooled is very simple - air is drawn in by the fan via the vent underneath, the air is pushed out of the side of the laptop through the heat-sink vent which is metallic and resembles a crude car radiator (and works in a similar way). This heat sink has usually a copper pipe that runs through the laptop and sits on top of the CPU (Laptop's processor) and the Graphics chip. Because the air that is sucked in is cool, it cools the pipe and thus the CPU and Graphics chip. It needs a clear, dust-free heat-sink to operate effectively.
How to prevent your Laptop from overheating
In order to keep your laptop from overheating, it's a good idea when you notice it always runs hot underneath (or the fan is constantly on), to get your local PC engineer to strip it down and clean out the heat-sink (the metal cooling grille in the above pic). You can do it yourself if you are confident.
If this hasn't been done, and your laptop refuses to boot, there is a possibility that it has been left too long running at such a high temperature. What happens is subject to differing views. Most people believe that because the fan cannot supply enough cool air, the solder holding all of the connections of the VGA chip to the motherboard get too hot and start to melt, and some data pins lose connection through constant excessive heat and cooling. The solder joints may then crack leaving some pins not actually transmitting data from the Graphics chip to the motherboard.
You will read many times that people blast a can of pressurised air into the vent at the side of the laptop. If you do this from the start of a Laptop's life once a month then it will be ok, and will probably never need stripping down. The reason I say at the beginning of its life is because if you purchase a Laptop used and it seems to be running hot, and you blow an air-can into it, you COULD dislodge the thick layer of dust that may ALREADY be present and push it back into the fan - this can jam the fan and prevent it from spinning. So if you do this, make sure the fan is still spinning after you have blown out the dust. If it doesn't come on when the Laptop heats up - turn it off! This is when a strip-down and clean is required. If you continue to use it, say goodbye to it.
Some people believe that the damage of excessive heat is within the chip itself. In which case the only solution is to have it removed and replaced. This makes sense because the 'repair' I will explain about below, doesn't always last that long. Sometimes you will be lucky, but generally I would suggest the repair should be considered a temporary one and used if all else fails.

How to repair a faulty graphics card with a heat gun
As mentioned above, this method is NOT a solid, reliable fix. If it works, then look at someone who can fully replace the VGA chip on your motherboard as soon as possible. It may last you a day or 6 months (probably not though).
You will need:
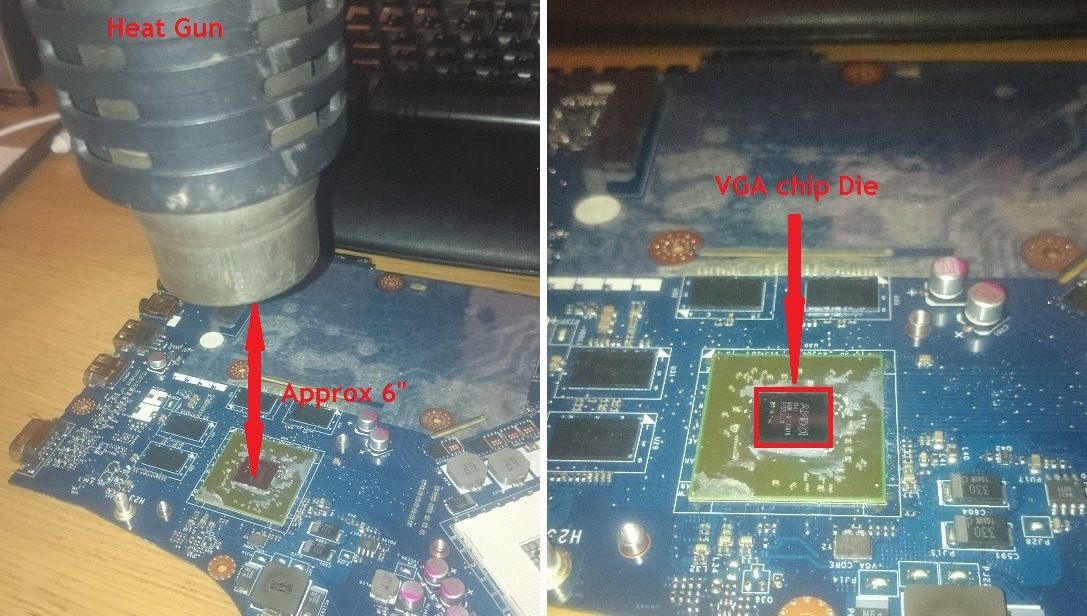
Firstly, use the screwdriver to remove the heatsink from your motherboard. Taking care to release each screw BIT-BY-BIT. This is so you do not have unequal pressure on any side of the Processor or VGA chip, which may result in you chipping the edge of one of these - which could spell the end of your motherboard. So unscrew 2 turns at a time each screw, ideally unscrewing opposite sides - like a car wheel. When the screws are removed, you may find the heatsink is stuck. This is the thermal paste acting like glue - just twist the heatsink slightly and lift off, to expose the CPU and VGA chips. Use the sharp blade CAREFULLY and scrape off any excess paste that may have dried. If it isn't dry and still quite moist, you may just be able to use the cloth and simply wipe it away. You need to get every single bit of thermal paste off from the chips, because when we come to put some new paste on, the chips should be FLAT with no bumps whatsoever.
So we now have the chips exposed, so the next thing you want to do is to place the motherboard on a flat surface. Then set your heat gun to a low setting. The aim is to warm the whole motherboard up slowly by no more than 2 °C per second. Use a standard thermometer to give you an idea first of how far away you should hold the gun. It won't be spot on because you are heating up a whole board and not a small thermometer, but you can know that it will take LONGER to heat up the motherboard because any heat will dissipate into the board very quickly. It will help you though! If you don't have a thermometer or any other way of gauging it - aim for a low heat for 30 seconds 6" from the board. Heat all over. I can't be precise because different guns have different settings, and if your gun doesn't have variable settings, hold it further from the board. We are trying to get to about 60 °C after 30 seconds, which will feel very hot to the touch but not hot enough that you can't stand it. When you get to this stage, you need to turn up the heat to med for another 30 seconds - or move in closer if you have no adjustment. Again, 2 °C per second, so we are aiming for 120 °C now - you won't be able to touch. After this, we need to concentrate on the VGA chip only, the whole chip and not just the Die (see pic) because soon the solder will start to melt after you have put your gun on the High setting. This time, 35 seconds but only concentrate the heat on the VGA chip! The temp we are ultimately aiming for is 188 °C. Now all we do is reverse the process - turn the heat down and gradually decrease the heat over 1 minute. We don't want the board to cool any quicker than 3 °C per second. Then, leave it for 20 mins.
You will need:
- a crossed-head screwdriver
- a sharp blade
- a cloth
- a heat gun
- some thermal paste
Firstly, use the screwdriver to remove the heatsink from your motherboard. Taking care to release each screw BIT-BY-BIT. This is so you do not have unequal pressure on any side of the Processor or VGA chip, which may result in you chipping the edge of one of these - which could spell the end of your motherboard. So unscrew 2 turns at a time each screw, ideally unscrewing opposite sides - like a car wheel. When the screws are removed, you may find the heatsink is stuck. This is the thermal paste acting like glue - just twist the heatsink slightly and lift off, to expose the CPU and VGA chips. Use the sharp blade CAREFULLY and scrape off any excess paste that may have dried. If it isn't dry and still quite moist, you may just be able to use the cloth and simply wipe it away. You need to get every single bit of thermal paste off from the chips, because when we come to put some new paste on, the chips should be FLAT with no bumps whatsoever.
So we now have the chips exposed, so the next thing you want to do is to place the motherboard on a flat surface. Then set your heat gun to a low setting. The aim is to warm the whole motherboard up slowly by no more than 2 °C per second. Use a standard thermometer to give you an idea first of how far away you should hold the gun. It won't be spot on because you are heating up a whole board and not a small thermometer, but you can know that it will take LONGER to heat up the motherboard because any heat will dissipate into the board very quickly. It will help you though! If you don't have a thermometer or any other way of gauging it - aim for a low heat for 30 seconds 6" from the board. Heat all over. I can't be precise because different guns have different settings, and if your gun doesn't have variable settings, hold it further from the board. We are trying to get to about 60 °C after 30 seconds, which will feel very hot to the touch but not hot enough that you can't stand it. When you get to this stage, you need to turn up the heat to med for another 30 seconds - or move in closer if you have no adjustment. Again, 2 °C per second, so we are aiming for 120 °C now - you won't be able to touch. After this, we need to concentrate on the VGA chip only, the whole chip and not just the Die (see pic) because soon the solder will start to melt after you have put your gun on the High setting. This time, 35 seconds but only concentrate the heat on the VGA chip! The temp we are ultimately aiming for is 188 °C. Now all we do is reverse the process - turn the heat down and gradually decrease the heat over 1 minute. We don't want the board to cool any quicker than 3 °C per second. Then, leave it for 20 mins.

Once the board has cooled down sufficiently, we need to add some new thermal paste. Add a small amount onto your finger and spread over the chips (after ensuring there is absolutely NO bumps or old solder left), getting as flat as possible and ensuring the whole Die is covered. Replace the heatsink and screw back onto the board but again, 1 screw at a time and only 2 turns at a time. Put your laptop back together and fire it up!
The reason we have heated the whole board is because we don't want to crack it or damage any solder joints but just heating one part of the board will do this. I see many websites who don't offer this advice.
Again, this method WILL work for some but not everyone.
Faulty motherboard
So we have gone through all of the possible scenarios above. If none of them work, then there is a high probability it is the motherboard itself. If you don't want to just chuck it, take your laptop to your local Laptop repair centre for their opinion. It might be time to get a new motherboard! You can sometimes get a replacement from somewhere like Ebay, but you must remember that occasionally, these boards have been repaired by the heat method above and sold as good boards. There is NO way of telling which boards are good ones, so firstly make sure you have checked out the returns policy and warranty period.
FREE security & stability scan

Faulty screen
So we have almost exhausted our options as the why your Laptop won't boot. Another thing to try is the LCD screen -so get hold of a VGA monitor cable. If you have a PC or a friend has one, it's the cable that goes from the monitor to the VGA card in the back of the PC. It is possible the connectors may be different - this is the one you need!
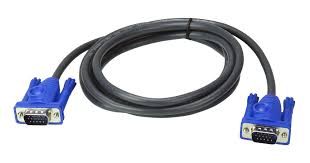
Your laptop will have a place, usually at the side, where you can plug one of these in. Take the other end and either plug into your TV or a PC. Then switch the laptop on, and maybe you will see an image on the TV / PC. Ok, this is where it still may NOT tell us if the laptop screen is at fault! So what's the point? Well it will tell you if your laptop is working, so you can say it's probably either the VGA chip or the laptop screen. The only real way to find out if your screen is faulty, is to try another one.
It isn't always easy determining why your laptop won't turn on - but I hope some of these solutions will at least help SOMEONE!
It isn't always easy determining why your laptop won't turn on - but I hope some of these solutions will at least help SOMEONE!